Click here to get this post in PDF
Running a business on a Mac or have a team of employees who use this type of computer for work? This post is for you. We believe that it’s vital to know how to put its security features to good use to protect your business data. In this post, we’ll show you how to add an extra level of security to your Mac and protect it from malware, viruses, and hacker attacks.
Adjust security settings on your Mac
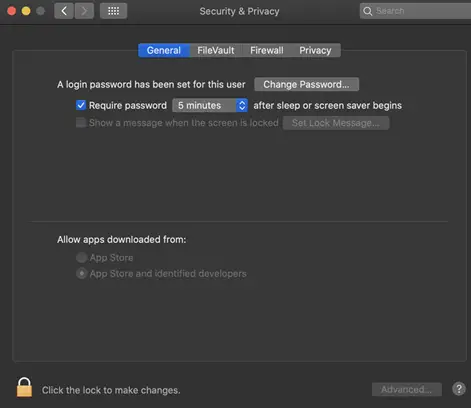
Above all, you should encourage your employees to use macOS built-in security tools. You can find them by going to the Apple logo – System Preferences – Security & Privacy. That will take you to macOS security options, including General, FileVault, Firewall, and Privacy. Let’s see what they can do to protect your business.
General. This option lets you secure your Mac with a password, which is an essential step in protecting your data. You can set it up to require a password in a time range of up to 8 hours, but it’s recommended to go with the immediate option. Additionally, General is the place to ban your Mac from downloading apps outside the Mac App Store, as third-party apps may not be secure.
FileVault. This security option can turn your Mac’s disk into a Fort Knox, so the hackers cannot lay their hands on your data without a security key, which is in your possession. Thus, it’s highly recommended for any business to advise their employees to enable FileVault.
Firewall. A firewall is a must-have for any business looking to protect its network from unknown incoming traffic. Thus, be well advised to turn on the firewall on your Mac. After you enable it, go to its options to review the services connecting to your macOS and adjust your access preferences using the requisite buttons. You can also hide your network from prying eyes by checking the box against “Use Stealth Mode.”
Privacy. This option is designed to manage the access of your apps to your data. For example, if you click on Camera, you’ll see a list of apps on your Mac that have access to your camera. In Privacy, go over each category and set up permissions to each type of data. While you’re at it, be deliberate about allowing apps to access your data, camera, and microphone and avoid unnecessary permissions.
Manage your data sharing options
It’s essential to avoid unnecessary data sharing permissions so as not to expose your data to hackers. As such, to stay on the safe side, make sure this list includes just those items you have to share. You can access this option by going to the Apple menu – System Preferences – Sharing. Pay special attention to Remote access and disable it if it’s not needed.
Secure your browser
Your browser can be a gateway for viruses and malware, so it’s a good idea to strengthen its security. To do that, launch your browser and head to its settings to find privacy and security options. Then, find and check the ones that are responsible for disabling tracking your browsing behavior. Ideally, your browser should offer a safe browsing mode and malicious website alerts, so check if you can activate those options as well.
Keep macOS current automatically
Ignoring updates can make your Mac vulnerable to malware and hackers. Not only do new versions boost your computer’s performance, but updating also eliminates security flaws of the previous versions. With this in mind, you can enable automatic updates in the Mac App Store to let the most recent versions of apps land on your Mac without bringing you into the loop. macOS also offers an automatic update option for your operating system. These options reside under the Apple menu – System Preferences – Software Updates.
Back up your data
Keeping an extra copy of your files can pay off in the long run. macOS is a secure operating system, but it’s not entirely immune to viruses. Let’s say your Mac catches a virus and corrupts your data. In another scenario, you can lose data because of disk failure, the causes of which are explained here. Backing up your Mac will shield you from the risks of losing your business data in any of these scenarios. With this in mind, purchase an external hard drive and set up a daily backup.
Finally, use Find My Mac
This is an advanced security feature that will let you know your Mac’s whereabouts if you happen to lose it. You can access Find My Mac via the System Preferences – Security & Privacy – Privacy. Here you should enable location tracking and then go to your System Preferences again and click Apple ID – iCloud. Then find and check the “Find My Mac” option. On top of that, you can use Find My Mac to lock your device remotely.
Knowing that your business data is safe at all times should definitely put your mind at ease. Hopefully, our advice has helped you (and your employees) boost your organization’s security.
You may also like: Understand These Security Measures For Utmost Business Protection!
Image source: Pixabay.com


